Tuesday, June 30, 2015

Half-Moon Taco Burgers

Ground meat isn't unusual in a taco, but I decided to change things up by making half-moon shaped burgers that would fit neatly inside a tortilla.

I flavored them with peppers and chili powder, melted cheese on top, and served them in warm tortillas with guacamole and pepper.

The result was pretty danged good.

The meat I used was a combination of beef and chicken from a company called Cluck 'n Moo that specializes in...well, clucks and moos.

Because the meat includes chicken, it needs to be cooked to a safe temperature - no rare burgers with this stuff.

You can make these less spicy by using mild pepper and mild chile powder, or make it more spicy by using hotter peppers and chile powder. And of course, you can add extra spice with your choice of condiments, like peppers or salsa.

Half-Moon Taco Burgers
By Donna

1 pound Cluck 'n Moo ground chicken and beef
1 4-ounce can diced Hatch chiles (hot or mild, your choice)
2 teaspoons chili powder (hot or mild, your choice)
1/2 teaspoon salt (or to taste)
1 cup shredded cheese (I used a mix of cheeses, but any good-melting cheese will work)

In a medium bowl, combine the ground meat, chiles and chili powder.

Divide the meat into four portions. Shape each portion into a half-moon shape that will fit into your tortilla. I used 6-inch tortillas and made the burgers slightly smaller that the tortillas - keep in mind that the tortillas need to wrap the meat.

Heat your grill. Sprinkle the burgers with salt as desired and cook, flipping as needed, until just about done. Divide the cheese onto the tops of the four burgers, close the grill and let them cook until the cheese is almost melted.

When the cheese is almost melted, place the tortillas on the grill (on a cooler part of the grill, if possible.) Place the burgers on the tortillas and close the grill again. Cook until the cheese is melted and the tortillas are warmed.


Serve with your favorite taco toppings. I used guacamole and pickled jalapenos. Other options are shredded lettuce, salsa, cilantro, crema or chopped fresh tomatoes.

Monday, June 29, 2015

The Cluck 'n Moo Challenge

Look for Jennifer's Banh Mi Burger recipe coming in July
37 Cooks gets the opportunity to work with a lot of fun companies. Some are well-known, and others are a little less mainstream.

This time, we're working with a company called Cluck 'n Moo, and their product is called...Cluck 'n Moo. It's a blend of antibiotic-free chicken and grass-fed beef, ground into a product that boasts 52% less fat and 34% fewer calories than traditional grain-fed beef burgers. It's gluten-free, too!


The company sells Cluck ‘n Moo burgers, as well as 1-pound packages of ground meat. The cooks at 37 Cooks all received the ground product to make their own burgers or other creations and they did a great job.

Earlier this month we gave you a sneak peek of a Smoky Black and Bloo Burger and a Chimichurri Burger, and now we're gearing up for a whole lot of tasty recipes that are perfect for summer. Or, really for any time.

The Cluck 'n Moo blend was created by trend-setting

marketer Steve Gold, who came up with the idea the old fashioned way: At the kitchen table. He was grilling burgers for his family when his wife, Helene, sighed that she dreamed of a great-tasting burger she could enjoy without the fat guilt.

By adding chicken to the beef, the fat content was lowered, while the blend still has great flavor.

We encourage you to visit Cluck 'n Moo on Facebook and follow them on Twitter, Pinterest and Instagram.

Wednesday, June 24, 2015

Buffalo Chicken Meatballs

Buffalo Chicken Meatballs
by Sarah M.

Olive oil
1/2 cup carrots, finely diced
1/2 cup celery, finely diced
1/2 cup white onion, finely diced
Salt and pepper
1 pound ground chicken, lean
1/2 cup good blue cheese crumbles
1/4 cup plus extra Frank’s Red Hot sauce (or use your favorite)
1 egg
2-3 Tablespoons bread crumbs (I used Italian seasoning breadcrumbs)


Heat a non-stick pan on the stove over medium-high heat. Add enough oil to coat the pan and add in the carrots, celery and onion; season generously with salt and pepper. Sauté mixture until onion is translucent and vegetables become soft; approximately 10-15 minutes. Transfer mixture to a bowl and let cool (I popped mine into the freezer for a few minutes.)

In a large mixing bowl, add the ground chicken and season with a little salt and a good amount of cracked pepper. Add in the vegetable mixture, blue cheese, hot sauce, egg and breadcrumbs. Mix to combine well. (Be careful to not over mix or the meatballs will become tough.) If the mixture seems to “wet” add more breadcrumbs.

Preheat oven to 400°F. Form meatballs into desired size, just make sure they are all the uniform. Place onto a baking sheet lined with the Mrs. Anderson's Non-Stick Silicone Baking Mat from Harold Import Company.

Spoon on a little bit more hot sauce onto each meatball. Bake at 400°F for about 20-25 minutes, then broil them for about 5 minutes, or until they become nice and brown on top.

To re-heat, spoon over a little more hot sauce and let get to temperature in a low oven.

Serve with a good blue cheese dressing with celery on the side. Enjoy!

Tuesday, June 23, 2015

Strawberry Puff Pastry Flowers with Lemon Mascarpone Whipped Cream

Strawberry Puff Pastry Flowers with Lemon Mascarpone Whipped Cream
by Sarah K.
Makes 12 pastries

Strawberry Puff Pastry Flowers

Frozen puff pastry, thawed
2 Tablespoons granulated sugar 
12 small strawberries
Honey

Preheat oven to 425°F.

On a lightly-floured surface, roll a sheet of puff pastry out to 1/4" thickness. Sprinkle dough with granulated sugar, pressing lightly into the dough.

Using a flower-shaped cookie cutter with diameter approximately 2-2.5 times the width of your strawberries, cut out flower-shaped pieces of dough.

Transfer dough to baking sheet fitted with Mrs. Anderson's silicone bread crisping mat.

Cut the tops off each strawberry. Place a strawberry in the middle of each flower and bake for 25 min, until the flower petals are puffed up and golden brown.

Once out of the oven, brush strawberries lightly with honey.

Let the pastries cool for 5 minutes, then serve with tea and a dollop of Lemon Mascarpone Whipped Cream (recipe below) on the side.

Lemon Mascarpone Whipped Cream 
by Sarah K

1/2 cup heavy or whipping cream
1 Tablespoon granulated sugar
Zest of one lemon
1/4 cup mascarpone cheese.

While the pastries are baking, whip cream with sugar in a bowl until it begins to form soft peaks. Add the lemon zest (optional: Reserve a bit of the zest for garnishing) and continue beating for half a minute. Add the mascarpone and whip until it forms stiff peaks.

Monday, June 22, 2015

Whole Wheat S’mores Cookies

When I think of summer, I always think of lazy nights spent around a campfire chasing fireflies and making s’mores. Unfortunately, the weather here in upstate New York doesn’t always cooperate – it can be pretty chilly at night well into June and I’m more likely to be found inside with a cup of coffee. Of course, that hasn’t stopped me from coming up with other ways to enjoy classic s’mores flavor! I’ve tried everything from making them in the microwave (surprisingly efficient) to baking them inside wonton wrappers. You really can’t go wrong with the chocolate, marshmallow and graham cracker combination!

Lately, these s’mores cookies have been my favorite way to enjoy this sweet treat. They’re totally addictive! The cookies are crisp, but the whole wheat pastry flour gives them a tender crumb that’s soft – but not chewy – in the center. Graham flour adds both texture and flavor while milk chocolate chips and mini marshmallows add a touch of sweetness.

The one tricky part about making these cookies is that the marshmallows can melt and onto the pan before the cookies are finished baking, which makes a mess and causes the cookies to stick. Lining your pan with a silicon mat, like the ones from Mrs. Anderson's Baking at Harold Import Company, helps prevent them from sticking.

What I especially love about these cookies is that they aren’t super sweet, so they don’t set me off on a sugar craving. One or two cookies with a cup of tea is a perfectly satisfying afternoon snack.

Whole Wheat S’mores Cookies
by Lauren
Adapted from Healthy Delicious Whole Wheat S'mores Cookies

1 cup butter, softened
3/4 cup granulated sugar
3/4 cup brown sugar (packed)
2 eggs
1 teaspoon vanilla extract
1 1/2 cups whole wheat pastry flour
3/4 cup graham flour
1 teaspoon baking soda
1 teaspoon salt
2 cups milk chocolate chips
1 cup mini marshmallows

Heat your oven to 350°F. Line a cookie sheet with a silicon baking mat.


In a large mixing bowl, cream together the butter and sugars until light and fluffy. Add in the eggs, one at a time, and beat until mixed. Mix in the vanilla.

In a second bowl, combine the flours, baking soda and salt. Gradually mix the dry ingredients into the wet ingredients (the dough will be very thick.) Mix in the chocolate chips and marshmallows.

Drop rounded tablespoons of the dough 2 inches apart on the prepared cookie sheet. Bake for 9-11 minutes, or until the edges begin to brown. Let cool on the baking sheets for 1 minute, then cool completely on a rack.

Yield 4 dozen cookies.

Friday, June 19, 2015

Easy Asian for One - Spicy Green Beans & Shrimp

I am always looking for easy dinners to prepare on my husband's poker night. When it is just me, I want something tasty, but I don't want a big mess. This dish is so good, so easy and the clean-up is effortless thanks to my Mrs. Anderson's Baking Mat from Harold Import Company.

Easy Asian for One - Spicy Green Beans & Shrimp
by Linda

Ingredients for roasting:
A handful of frozen green beans, trimmed (I used the frozen Organic Petite Whole Green Beans from Costco)
4 extra large shrimp, peeled and cleaned
1 teaspoon sesame oil
1 slice (ring) of a blood orange

Ingredients for sauce:
Juice from a blood orange
1 teaspoon light brown sugar
1 teaspoon soy sauce
1 teaspoon fish sauce
1 teaspoon grated fresh ginger
2 teaspoon chili garlic sauce
1/4 teaspoon Aleppo chili pepper

1. Preheat oven to 350°F.

2. In large mixing bowl, toss green beans and shrimp with sesame oil.

3. Place green beans, shrimp and blood orange slice on mat in single layer.

4. Bake 20-25 minutes, until green beans look slightly wrinkled and shrimp are pink.
(I turned the shrimp half way through)

5. Using a small saucepan, add all the ingredients for the sauce.

6. Place on low heat and simmer for 5 minutes.

7. Remove green beans and shrimp from oven and place back into (cleaned) large mixing bowl.

8. Pour sauce over them and gently toss.

9. Transfer to plate, garnish with the blood orange slice.

Thursday, June 18, 2015

Shrimp Toast

This is another quick and easy recipe that is perfect for lunch for two! The Shrimp Toast is nice and crispy thanks to the Mrs. Anderson's Crisping Mat from Harold Import Company.

Shrimp Toast
by Linda

4 slices of white bread, cut into rounds with a 4" cookie cutter
Butter, softened
12 large precooked shrimp
1 teaspoon minced garlic
1 teaspoon grated fresh ginger
1 teaspoon hoisin sauce
1 teaspoon garlic chili sauce
2 Tablespoons red wine vinegar
1 Tablespoon heavy whipping cream
Juice from 1/2 lemon
1/2 teaspoon black pepper
Cajun seasoning (I used Slap Ya Mama Hot)
Sesame seeds
Grated red cabbage and cilantro for garnish

1. Preheat oven to 425°F.
2. Thinly spread butter on each bread round.

3. Place bread, butter side up, on cookie sheet with crisping mat on top.

4. Place in oven 2-3 minutes to lightly brown, turn and lightly brown other side.

5. Remove from oven and set aside.

6. Combine shrimp, garlic, ginger, hoisin sauce, garlic chili sauce, red wine vinegar, heavy whipping cream, lemon juice and black pepper into a food processor.

7. Pulse until you have a smooth paste.

8. Taste and adjust seasonings, if needed.

9. Divide mixture between toasted rounds, buttered side up. 
10. Lightly sprinkle with Cajun seasoning.

11. Generously sprinkle with sesame seeds.

12. Return to oven on baking crisping mat for 10 minutes.

13. Garnish and serve.

Wednesday, June 17, 2015

Pizza Savoyarde

My husband was born in the Alps. Raclette cheese melted over potatoes and smoked ham was a staple in the cold winter. He has fond memories of his family and friends gathering for raclette parties next to the fire. Fast forward many years, we traveled back to his old village to visit. We stopped in a small pizzeria for lunch and ordered his favorite winter dish topped on a pizza. One bite and we were hooked! Now we can enjoy this typical winter dish any time of the year topped on a pizza.

Mrs. Anderson's Non-Stick Silicone Bread Crisping Mat was a delight to work with. Once rolled out, the pizza dough caught onto the grooves of the mat which helped it to keep it's form. After being baked, the pizza slid off of the mat with ease. The crust was crisp on the outside and chewy inside. This mat will be my go-to for all of my future bread and pizza baking ventures!

Pizza Savoyarde
by Tonda

4 medium Yukon Gold potatoes
1 Tablespoon olive oil
1 medium yellow onion, sliced
2 cloves garlic, minced
5 thick slices of bacon, cut vertically into 1/2-inch slices
1 Tablespoon chives, chopped
6 Tablespoons crème fraîche
14 ounces of your favorite pizza dough
1/2 pound raclette cheese, thinly sliced
16 cherry tomatoes

Boil the potatoes in a large pot of water until they are cooked through, approximately 20 minutes. Drain and set aside to cool. Once cool enough to handle, slice into 1/4-inch rounds. 

Preheat the oven to 400°F. SautĂ© the onions and garlic in olive oil until the onions are transparent and soft. Remove the mixture from the pan and set aside. Add the bacon to the pan and fry until cooked through, but still soft. Drain and set aside. 

Mix the chives into the crème fraĂ®che. 

Roll out the pizza crust into an 8 x 15 rectangle. Lay the non-stick silicone bread crisping mat in an 11 x 17 baking sheet. Add the pizza crust. Spread the crème fraĂ®che mixture over the crust. Sprinkle the onions and bacon evenly over crème fraĂ®che mixture. Add the potato slices and then cover with the raclette cheese. Dot the pizza with cherry tomatoes. 

Bake until the cheese is nice and bubbly, approximately 15-20 minutes. Enjoy with a fresh salad and a glass of dry white wine such as, Apremont or Vouvray. Bon Appétit!

Tuesday, June 16, 2015

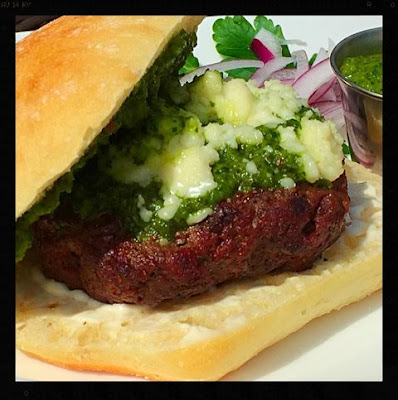
Cluck’n Moo Chimichurri Burger


Some years ago, on a visit to central Texas to spend some time with my dad, I decided to make some chimichurri sauce to go with the fajitas I was told were going to be served for dinner. If you’ve never had chimichurri sauce before, you’re in for a treat. It’s tangy and spicy and surprisingly fresh tasting. So, anyway, I got to my dad’s house and quickly whipped up a batch of chimichurri sauce. We all sat around the table and my dad says, “What’s this green stuff in this bowl?” Note that he didn’t actually say “stuff” but something a little more explicit. I explained to him what it was, and he begrudgingly agreed to try some. At the end of the meal he looked at me from across the table and proclaimed, “The green swamp goo was pretty good!” Thanks, Dad.

Anyway, when presented with the Cluck’n Moo Challenge, the first thing that came to mind was a chimichurri burger. Al, my way better half, was all too willing to be my official taste tester…again. I received a generous sample of the Cluck 'n Moo Ground and OMG! It was frozen SOLID! I was worried about Cluck’n Moo shipping the ground meat to me all the way to Texas in our 90Âş weather, but it arrived fully frozen. Yowza, we were in business. Honestly, looking at the product I would never guess that it was a mixture of beef and chicken. And cooking with it was just like cooking with any ground product. It is fresh, and delicious! And the fact that it’s gluten-free and antibiotic and hormone free? Even better. Fewer calories, less fat (and less saturated fat) is A+ in my book. According to my husband, that translates to more cheese allowance on his burger!

Cluck’n Moo Chimichurri Burger
by Maryjo

2 Tablespoons vegetable oil
1 1/2 cups red onion, diced
1/2 teaspoon red pepper flakes
1 Tablespoon crushed garlic (about 4 cloves)
2 1/2 pounds of Cluck 'n Moo Ground
3 Tablespoons red wine vinegar
1 Tablespoons Dijon mustard
1/2 teaspoon ground cumin
1/4 cup chopped parsley
1 teaspoon salt
Chimichurri Sauce (recipe below)
Cotija cheese, crumbled
Ciabatta rolls
Mayonnaise

Heat the vegetable oil in a skillet over medium-high heat until shimmering. Add the diced red onion and red pepper flakes and sauté over medium-high heat until soft, about three minutes. Add the crushed garlic, stir, and remove from heat to cool.

In a large bowl combine Cluck 'n Moo Ground, red wine vinegar, Dijon mustard, ground cumin, chopped parsley and salt. When cooled, add the sautĂ©ed onion mixture. Mix to combine and then form into six to eight patties. Cook the Cluck’n Moo patties as you would any burger (in a skillet or on the grill.) I grilled these burgers on a gas grill on high heat for about two minutes on each side. Then I turned the heat down to medium-low and let them hang out on the grill to cook through for another 6 or 7 minutes (turning them over again after 3 minutes.) Just remember that these burgers contain a combination of beef AND chicken, so you have to be sure you get the internal temperature up to 165°F. Use an instant read thermometer to check the internal temperature of your burgers before taking them off the grill. As the burgers were finishing up on the grill, I topped each one with 1 Tablespoon of the chimichurri sauce and about 1 Tablespoon of cotija cheese (you can use any cheese you like - feta would be a great substitute here.) Serve the burger on a ciabatta roll or on your favorite bun. I put some chimichurri sauce on one half of the roll and a little mayonnaise on the other half. Plantain chips with a little bowl of chimichurri dipping sauce make a great side dish too!

Chimichurri Sauce
by Maryjo

1 small red onion, quartered
5 cloves garlic
1 teaspoon red pepper flakes
2 cups fresh parsley, stems removed
1/4 cup red wine vinegar
1/2 teaspoon salt
1/2 cup olive oil

In a food processor, pulse the red onion and garlic until chopped. Add the red pepper flakes and the fresh parsley and pulse five to seven time until chopped and combined. Using a spatula, scrape the ingredients back down to the blade. Add the red wine vinegar and salt, replace the lid and pulse three or four more times to combine. With the food process running, slowly drizzle the olive oil into the mixture using the feed tube. You may need to stop and scrape down the sides again to be sure everything combines well. That’s it! Taste it for seasoning and add salt if needed. Then let it chill in the refrigerator (this sauce is even tastier the next day.)

Monday, June 15, 2015

Cluck 'n Moo Smokey Black and Bloo Burger


I love the long days of summer. Even though we live in Texas where the winters are very mild, it always seems that we fire up the grill more often in summer. Good burgers made at home always please a crowd and blow restaurant burgers out of the water. Who doesn't love a grilled burger? The folks over at Cluck 'n Moo understand the desire to eat healthy while still enjoying a good burger. They created a delicious blend of chicken and grass-fed beef, ground together into a product that has 52% less fat and 34% fewer calories than traditional grain-fed beef burgers. The blend is very flavorful and juicy when cooked. Give this product a try. I can guarantee that you will love it.

The black and blue burger is my husband's favorite. When we received Cluck 'n Moo to test, he immediately requested that I make his favorite. We made this burger on our Kamado Joe with apple wood to give it a smokey flavor. If you don't have an egg-shaped grill, you could also grill the burgers over medium-high heat (350-375°F) for an equally delicious burger. Because there is chicken in the blend, make sure that you cook the burgers to an internal temperature of 165°F.

Cluck 'n Moo Smokey Black and Bloo Burger
by Tonda

1 pound Cluck 'n Moo Ground
1 Tablespoon Italian parsley, chopped fine
1 teaspoon garlic powder
1/2 teaspoon ground black pepper
1/2 teaspoon salt
Blue cheese crumbles
4 slices apple wood smoked bacon, cooked until almost crisp

For the onions:
2 Tablespoons butter
1 red onion, sliced approximately 1/4-inch thick
2 Tablespoons brown sugar

Light the charcoal and preheat the egg to 250°F. Once it's up to heat, add some apple wood chunks to start the smoke.

Mix parsley, garlic powder, black pepper and salt in the Cluck 'n Moo blend. Shape into two 1/2 pound patties and then cover and refrigerate while starting the onions.

Melt butter over medium-low heat, add onions and brown sugar. Toss to cover the onions with the brown sugar. Cook until the onions are soft and caramelized, tossing occasionally. They should be done in approximately 20 minutes.

Smoke the burgers over indirect heat to in internal temperature of 150°F to get a nice smokey flavor. Remove the burgers to bring the egg temperature up to 450°F. Add the burgers back to the grill and sear over direct heat, approximately 2-3 minutes per side, until they reach an internal temperature of 165°F. *Do not press the burgers when flipping. That will press out the natural moisture of the meat and create a dry burger. Top the burgers with blue cheese and continue to cook until melted. Top the burgers with bacon and caramelized onions. Enjoy!

Thursday, June 11, 2015

Almond Sugar Chews

This is my go-to cookie recipe for unexpected sweet cravings. Unlike most sugar cookies, the dough doesn't require rest in the refrigerator and therefore cooks up quick. Plus, most kitchens have all the ingredients on hand without special shopping. (You can also omit the almonds and/or switch the almond extract for vanilla.)

Despite being dead simple, the texture is unlike traditional sugar cookies, too. They're crisp, but chewy, melt-in-mouth and completely addictive. You've been warned!

Almond Sugar Chews
by Kate
Adapted from Serious Eats Easy Chewy Sugar Cookies

14 Tablespoons unsalted butter, melted
1 1/2 cups sugar
3/4 teaspoon sea salt
1 egg
1 Tablespoon pure almond extract
2 1/4 cups bread flour
2 teaspoons baking powder
1/4 teaspoon baking soda
1/3 cup turbinado sugar
1/3 cup pulverized almonds (in chopper or food processor), preferably toasted

Tools:
Mrs Anderson's Non-Stick Baking Mats
Cookie sheets

Preheat oven to 375°F with racks in middle positions. Place Mrs Anderson's Non-Stick Baking Mats atop cookie sheets.

In the bowl of a mixer (or using a handheld mixer), combine butter, sugar and salt and mix until combined. Add egg and almond extract and mix again until combined.

Now add the flour, baking powder and baking soda to the bowl; mix once more.

In a separate bowl, combine the turbinado sugar and pulverized almonds.

Divide the dough into about 24 balls. Roll each ball in the almond sugar and place on the baking mat. Note: These cookies tend to spread. Eight per cookie sheet is recommended.

Once all the balls are on the mats, use the bottom of a measuring cup or a glass to press on each ball, flattening each into a disc about 1-inch thick.

Place your cookie sheets in the oven, and bake for four minutes. Then rotate the pans (top to bottom and front to back.)

Bake another 4-5 minutes or until the tops of the cookies are puffed and the edges look solid. The entire cookie may still be white rather than having golden edges, but they are cooked through.


Immediately, but gently, tap the pans on the range or counter to deflate the cookies. Let them cool for at least five minutes before transferring to a wire rack.

Once cookies are cool, immediately store in an air-tight container to preserve texture.

Tuesday, June 9, 2015

Saratoga Spuds

 The 1940's food writers Cora, Rose and Bob Brown wrote in their book "America Cooks": “A century ago, when Saratoga Springs was in its heyday as a fashionable resort, specialties from there swept the country, and one of them, Saratoga Chips, will endure as long as there are spuds left to slice.”

Is the name not ringing any bells? How about potato chips? The craze for thin crispy potato chips began in 1840's Saratoga Springs, New York. There are lots of stories about just who was the customer who wanted pan-fried potatoes sliced even thinner, to get even crispier - but let's not fuss about that. Let's get right to making fresh chips at home - right in the oven, using very little oil. That makes these chips healthy spuds!

Saratoga Spuds
by Maurita
Serves 4 to 6 as a side dish

3 large white potatoes, peeled
1-2 Tablespoons olive oil
Salt and freshly ground pepper

Preheat oven to 450˚F.

Slice potatoes very very thinly: I used my mandoline and cut them in even 3-mm slices, or about 1/8" thick. Toss the potato slices gently with olive oil, making sure to separate and turn the slices. Place the sliced potatoes on a baking sheet covered with parchment or the new Mrs. Anderson's Baking Mat from Harold Import Company. The potato slices should not overlap, but you don't have to worry about spacing them; they don't expand.

Sprinkle the potato slices with salt and pepper.

Bake uncovered about 10 minutes, then turn them and bake until they are golden and browned in spots, about 10 more minutes. Blot on absorbent paper and serve while still warm.

Variations:

Herby Saratoga Spuds - season before baking with your choice of chopped fresh or dried herbs

Saratoga Devil Spuds - season before baking with a liberal helping of crushed red pepper flakes

Saratoga Sweets - use peeled sweet potato. I like these dusted before baking with a bit of cumin and Aleppo pepper.

Monday, June 8, 2015

Roasted Salad


Spring is finally here, which means farmer’s markets are starting to pop up everywhere. I love shopping at the farmer’s markets in the city - so many locations and plenty of delicious options to choose from. I picked up some beautiful beets, kale, bok choy and heirloom tomatoes during my last trip to the farmer’s market.

Using the Mrs. Anderson’s Baking Mat that was sent to me from Harold Import Company, I decided to take all of my greens (including the beet tops) and the heirloom tomatoes and roasted them up to create a roasted salad - a little bit of a twist on the kale chip. This mat helped get the greens nice and crispy, which added a perfect crunch to the roasted salad.

Roasted Salad
by Jenny

1 bunch kale (variety of your choice)
1 bunch beet greens
2 cups baby bok choy (greens only)
1 pint heirloom cherry tomatoes
3 cloves garlic
1/4 cup olive oil
2 1/2 Tablespoons fig balsamic vinegar
1/4 teaspoon kosher salt
1/4 teaspoon fresh ground black pepper

Preheat oven to 375°F.

Line a baking sheet with the Mrs. Anderson’s Baking Mat and set aside.

Rinse and dry all of the greens, tear into 1-2 inch pieces and set aside.

Rinse heirloom tomatoes and slice in half and set aside.

Peel garlic, crush by pressing down with the side of the blade of the knife and set aside.

In a medium bowl, add olive oil, balsamic vinegar, salt and pepper, whisk until incorporated.

Add sliced tomatoes and garlic into bowl, toss to coat and let stand for 10 minutes.

Remove tomatoes from marinade and place onto half of Mrs. Anderson’s Baking Mat, leaving marinade in bowl, set aside.

Roast tomatoes for 45 minutes.

Add greens to remaining marinade in bowl and gently rub marinade on leaves to coat them completely.

Remove pan and add as many of the greens that you can fit onto the other half of the baking mat without overlapping.

Return to oven and roast for 5-7 minutes or until greens are nice and crispy.

Repeat until all greens are roasted and tomatoes are tender and juicy.

Add greens to a large bowl and top with roasted tomatoes and any remaining marinade.
 
Serves 4

Thursday, June 4, 2015

Sourdough Bread on the Crisper Mat


I like to make bread, and love to make sourdough bread. I usually have a culture going, sometimes two or three different ones. When the Harold Import Co. sent me a Mrs. Anderson's Bread Crisping Mat, I was eager to try it. Would I get a crispy bottom crust?

And the answer is - yes, indeed I did. I let a free-form loaf and half a dozen rolls rise in place on the mat, then slashed and baked them. I ended up with bread whose bottom crusts are just as crackly as the tops. Look at the second photo - a closeup of the bottom crust. See the little pebbly bits? This is wonderful texture. 

You can use your favorite bread recipe, or even use this mat to crisp up a store-bought loaf. If you'd like my blueprint for sourdough bread, I've included it here - though, of course, you can swap water or beer for the milk, sugar for honey, toss in a handful of chopped herbs or maybe olives and walnuts...you get the idea. Once you start baking, you never know quite where you'll end up.


If you like crust, though - this mat's for you.

Sourdough Bread on the Crisping Mat
by Maurita

Maurita's Sourdough Bread Blueprint

1. Prepare your sourdough culture for use - wake it up
Remove culture from fridge. Add 1 cup white bread flour and 3/4 cup (6 ounces) warm water to the jar; mix briefly. It need not be lump-free. Let stand at 70-85°F for 3 to 8 hours (this will vary) until the culture is actively fermenting, as shown by bubbles on the surface.

2. Mix in more flour and water and let rise
Transfer the active culture (should be 2 cups now) to a large (4-quart) mixing bowl, and mix it with 3 cups flour and 2 cups warm water. Again, it need not be lump-free. Cover with a clean towel, and let rise at room temperature for 12 hours or so.

3. Save a bit for next time
Save and refrigerate 1 cup culture from the 1st proof, before proceeding. I keep the sourdough starter in a glass jar in my refrigerator.

4. Now use the rest to make bread

4 cups culture (that's what's left in the bowl after step 3)
2 Tablespoons melted butter or oil
1 cup milk (2% or whole, doesn't matter)
2 teaspoons kosher salt
2 Tablespoons honey
Up to 6 more cups bread flour

NOTE: You can substitute 1 cup wheat germ for 1 cup of this flour, or up to 2 cups whole wheat flour for 2 cups of the flour.

Assuming the rest of the culture is in a large mixing bowl, now you're ready to go.

Melt butter, add milk to butter and warm briefly (to 75-85°F) then add the salt and honey, and stir until dissolved. Add this mixture to the culture and mix well.

Add the flour (if by hand, 1 cup at a time; if using a KitchenAid mixer, 5 cups at once) and mix well. Let rest 15 minutes before adding in the last 1 cup of flour. Turn the dough out onto a floured board and knead until smooth and satiny.

Divide the dough and shape into loaves or rolls. Put into greased pans, and let rise, covered with a towel, 1.5-3 hours. When the dough crowns over the pan rims, it’s ready to bake. (Poke gently: if the indentation stays, it's risen enough.) At the last minute, slash the loaves or rolls using a lame or straight razor.

Bake in preheated 375°F oven 35-40 minutes. Loaves and rolls should sound hollow when the bottoms are tapped.

NOTE on pans: If you use 1-pound loaf pans, expect to use 3; if you use 1.5-pound pans, expect to use 2. This makes terrific free-form loaves and rolls.