Thursday, June 30, 2016

Jada Lime Grilled Corn

I love grilled corn on the cob. The slight bit of smokiness and char from the grill highlights the sweetness of the fresh corn. Topping the corn with Jada Lime Chicken Salt seasoned butter adds a tangy sunniness to this summer treat.

Jada Lime Grilled Corn
by Diana

4 ears of corn, silk removed but inner husks intact
Water
1/2 cup unsalted butter, softened
1/2 teaspoon Jada Lime Chicken Salt
1/4 cup finely shredded Parmesan or aged Asiago cheese

Soak the corn with the silk removed, but inner husks still intact, for an hour in water. This will help to keep the corn from charring too much.

Make the butter by mixing the unsalted butter, Jada Lime Chicken Salt and cheese together. Set the butter aside until ready to serve.

Preheat your grill on medium-high. Grill corn for about 10 minutes, turning a few times until done. Depending on the size of the ears of corn, this may take a few minutes more or less. Pull back the husks and slather with the Jada Lime butter. Don't forget the napkins!

Wednesday, June 29, 2016

Mixed Vegetables with Chicken Salt Spice Blend

Since it is barbecue season and there is a nice vegetable assortment in Korea, I made a Chicken Salt spice blend to go with them. The mixed vegetables can be made on the barbecue or in the oven, but since it is raining we made them in the oven.

Mixed Vegetables with Chicken Salt Spice Blend
by Nancy Follwell

Chicken Salt Spice Blend:
3 Tablespoons brown sugar
1 teaspoon Chicken Salt Lime
1 teaspoon Chicken Salt Barbecue
1 teaspoon Chicken Salt Turmeric
1 teaspoon Chicken Salt Original
1/2 teaspoon Chicken Salt Red Pepper

Mix all ingredients together and place in a shaker container.

Mixed Vegetables:
Brussels sprouts, cleaned, cut in half
Zucchini, 1-inch slices, cut in half
White mushrooms, cleaned, trimmed, thick slices
Brown mushrooms, cleaned, trimmed, thick slices
Yellow & red peppers, cleaned, cut in strips, then in half
Sweet potato, peeled, cut into thick chunks
Or whatever vegetables you have on hand.


Preheat oven to 400°F.

Place vegetables on an oven tray and pour 3 Tablespoons of olive oil and 2 Tablespoons Spice Blend over the vegetables. Toss to coat. Bake for 15 to 20 minutes until vegetables are tender. When they are done, sprinkle one more Tablespoon over the vegetables.

Tuesday, June 28, 2016

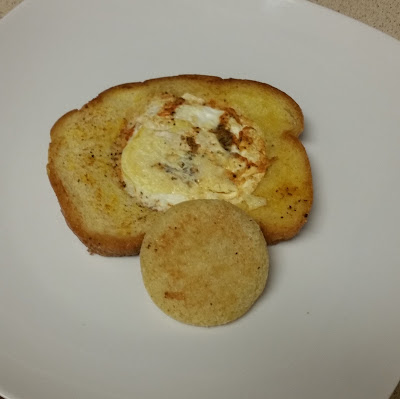
Low Sodium Chicken Salt Hole In The Middle

This recipe is known by many different names and always uses salt and pepper - but now, replace the salt and use the Low Sodium Chicken Salt. As for the names of this recipe, they can be "Hole In The Middle", "Toad In The Hole", Bird In The Basket" - nonetheless, this recipe takes you back to your childhood and, for some, their adulthood. When my bride Iloe and I first got married 17 years ago, she wanted something different for breakfast one morning - to which I said "I'll make you a Hole In The Middle". She looked at me perplexed as I went into our kitchen to make this fast breakfast treat.

Low Sodium Chicken Salt Hole In The Middle
by Glenn Edwards

1 slice of your favorite bread, at least 1/2-inch thick
1 egg
2 Tablespoons unsalted butter
Low Sodium Chicken Salt, to taste
Cracked black pepper, to taste

Cut a hole in the middle of bread and reserve the removed portion to toast. Put the butter in a skillet over medium-high heat and place the slice of bread in the skillet once the butter melts completely. Break the egg into the hole in the slice of bread and salt and pepper. Flip over the bread/egg carefully and continue to cook until egg is over-easy. Also, while the egg is cooking, take the reserved portion of bread from making the hole and toast it in the skillet, as well. Enjoy!

Monday, June 27, 2016

Fully Loaded Baked Potato Soup


Fully Loaded Baked Potato Soup
By Tamela K.
Adapted from Guy Fieri's Fully Loaded Baked Potato Soup

6 large baking potatoes
6 Tablespoons olive oil
3 Tablespoons Jada Spice's Low Sodium Chicken Salt seasoning, divided
16 ounces bacon
1 medium onion, diced
1/4 cup celery, diced
1/2 cup all-purpose flour
7 cups whole milk
1 Tablespoon freshly ground pepper
8 ounces sharp cheddar cheese, grated
6 ounces sour cream
3 Tablespoons finely chopped green onion

Preheat oven to 350°F. Scrub the outside of the potatoes. Rub approximately 1 Tablespoon of olive oil over the outside of each potato. Sprinkle the outside of each potato with approximately 1 teaspoon of Jada Spice's Low Sodium Chicken Salt seasoning. Roll each potato individually in enough aluminum foil to cover each potato. Bake the potatoes for approximately 1 hour, or until the potato is soft when pinched.

Cut bacon into strips and fry in large Dutch oven pot over medium heat until crisp. Remove bacon pieces from pot and place on paper towel. Drain approximately half of the bacon grease and discard. In the remaining grease, cook diced onion and celery over a low heat until they become soft, approximately 3 minutes. Add flour to Dutch oven and stir with onion and celery over low heat for 1 minute. Pour all of the milk into the mixture, stirring frequently and cook until it starts to thicken.

Unwrap baked potatoes from aluminum. Peal skins off of potatoes and discard. Cut potatoes into small cubes. Place potato cubes into the pot. If you prefer a thicker consistency for the soup, smash some of the potato cubes with a potato masher or back of spoon.

Stir in remaining 1 Tablespoon Jada Foods Low Sodium Chicken Salt seasoning, pepper, 6 ounces of grated cheese, 4 ounces of sour cream and 3/4 of the cooked bacon. Continue to cook and stir until the cheese is melted and soup is bubbly. Remove from heat.

Place soup into individual bowls. Top each bowl equally with the remaining cheese, sour cream, chopped green onion and bacon bits.

Thursday, June 23, 2016

Grilled Red Pepper Flatbread

I absolutely love pizza and flatbreads. I will make doughs monthly and freeze individual portions to cook up during the week. It is just such a versatile meal and makes lunches and dinners very fun. One of the fun things about doughs is that you can do anything with them. As far as seasoning goes...season your doughs to compliment what you are serving on them. Jada Chicken Salt seasoning helps you by making a few different seasonings to choose from. For this dough, I used the Red Pepper version. I did my flatbread on a grill (that is what this recipe calls for), but you can bake this in the oven.

Grilled Red Pepper Flatbread
by Traci

1 1/4 cup all-purpose flour and more for dusting
1/4 teaspoon sugar
1 1/2 teaspoons Chicken Salt Red Pepper seasoning
1/2 package active dry yeast
1/4 cup water (you may need more)

Mix all dry ingredients together in a medium bowl. Slowly stir in water, combining all ingredients together to form a dough. When combined, place it onto a floured cutting board. Knead until the dough is smooth and workable.

Place a towel over the dough and let it sit for about an hour, or until doubled in size.

When it has doubled, roll out onto the cutting board in a rectangular shape. You may need to dust with flour.

Heat your grill to a medium heat. Lightly oil the grate so your dough won't stick. Place your dough onto the grate and cook about 4 minutes, or to your desired crispiness. Take it off the grate and flip over. Top with your desired toppings. Place back onto the grill and allow to cook until the other side is done.

I hope this gives you a ton of ideas for great, easy meals.

Wednesday, June 22, 2016

Not your Mother's Collard Greens

When the folks at Jada Chicken Salt offered us samples of their different flavors, I couldn't wait to use them. Unfortunately, I had no idea of what I was going to make, until I saw some nice collard greens at the produce stand. I knew the Chicken Salt would work great in my greens! And speaking of greens, I worked with a young man that claimed his Granny made the best collard greens in the world. I told him that mine were better than his Granny's, and I'd make him some to compare, but that he had to be honest and tell me who had the best greens. I brought some to work one day, heated them up and let him try them. He opened the container, poked around in it with his fork, smelled it, then ate a big forkful. The big grin on his face told me whose greens were the best! And now, they're even better with the addition of Chicken Salt!

Not your Mother's Collard Greens
by Matt the Butcher

4 cups chicken broth
1 bunch collard greens, washed, tough stems removed
20 cloves peeled garlic (that's right, 20!!)
1 medium onion, sliced
8 ounces Teet's Smoked Pure Pork Sausage, sliced
2 Tablespoons Barbeque Chicken Salt
1 teaspoon Red Pepper Chicken Salt

Chop greens, add to a large pot with all the other ingredients and bring to a high simmer. Cook until greens are tender, about 90 minutes.

Tuesday, June 21, 2016

Spicy Pickled Cauliflower with Chicken Salt

What would you do with pickled cauliflower? What would you serve them with?

Truthfully, these go with everything. They're a little bit spicy and they're tart and savory and crunchy. They'll wake up your taste buds before a meal, and they work well with fried food and tacos.

I've been mowing through jars of these, with no stopping in sight.

For this recipe, I used two different salts from our most recent sponsor, Chicken Salt: the Red Pepper Chicken Salt and the Turmeric Chicken Salt.

Since this is so simple to make, I've been making small jars of it, to save storage space in the refrigerator. But you can double or triple or quadruple the recipe.

These are quick pickles, so they stay nice and crisp. Since they're not preserved, you'll need to store them in the refrigerator.

Pickled Spicy Cauliflower
By Donna Currie, Cookistry

Cauliflower florets to fit pint jar
2 teaspoons Red Pepper Chicken Salt
1/2 teaspoon Turmeric Chicken Salt
1/2 cup white vinegar
1 cup water

Cut the cauliflower into bite-size pieces and fit as many as possible into a pint jar. Add the Red Pepper and the Turmeric Chicken Salt.

Put the vinegar and water into a microwave-safe container. I used a glass measuring cup, so just one container for measuring and heating. You could also heat this on the stove in a pan. Heat to boiling.

Pour the hot water into the jar and screw the cover on firmly. Shake the jar to make sure the spices get nicely mixed in. Let the jar come to room temperature, then refrigerate until chilled.

This is done as soon as it's chilled, but it continues absorbing flavors as it sits.

Monday, June 20, 2016

Shrimp Fra Diavlo

The Chicken Salt Challenge has been very exciting. When I tasted the Red Pepper Chicken Salt, I knew immediately I had to make a Fra Diavlo. It has a good kick. Nothing makes me happier than seafood in a spicy red sauce with a thick pasta! I am a huge fan of shrimp, so I knew I had the right idea. I generally cook to please others, but this time, it was all about me! I did share the results with a few close friends, but I was the first one indulging in a beautiful bowl of Shrimp Fra Diavlo with fresh fettuccini.

Shrimp Fra Diavlo
by Susan Ritchie-Hubbard

2 Tablespoons extra virgin olive oil
3 large peeled garlic clove, roughly chopped
1 pound large shrimp, peeled, deveined, tail shells removed
Red Pepper Chicken Salt, to taste
Fresh cracked black pepper, to taste
1 small sweet onion, small dice
1/2 cup dry white wine
1 28-ounce can San Marzano crushed tomatoes
1 1/2 teaspoons Red Pepper Chicken Salt
1/4 teaspoon fresh cracked black pepper
12 ounces fresh Fettuccini (or dried if you prefer)

In a large deep skillet or Dutch oven, heat the oil and garlic over medium until it just begins to sizzle. Remove from heat. Let it sit while you prep the shrimp. If you have purchased the shrimp prepared, it must be time for a glass of wine while you wait for it to cool and infuse! Make sure to dry the shrimp with paper towels. Season each side with a dusting of the Red Pepper Chicken Salt (it has a handy shaker setting!) and fresh cracked black pepper. Reheat the oil and garlic over medium-high heat. When the oil shimmers and the garlic becomes fragrant, but not starting to brown, add the shrimp in a single layer. Cook the shrimp until they are still a bit translucent, approximately 1-2 minutes per side, depending on the “large” size of your shrimp. Lift the pan away from the heat briefly to transfer the shrimp to a plate. Return the pan to the stove and loosely cover the shrimp with foil. Set aside.

Lower the heat to medium, add onion and sauté until the onion softens and becomes translucent, approximately 4-6 minutes. Add the wine to deglaze the pan, scraping up all the delightful brown bits of goodness! When the wine is almost completely evaporated, add the crushed tomatoes, Red Pepper Chicken Salt and black pepper. It’s time to bring a large pot of salted water to a boil. (If you are using dried pasta, the process will take longer than fresh pasta. So it is important to guage your time accordingly.) When the sauce comes to a boil, reduce to medium low heat. Simmer, stirring occasionally, for approximately 30 minutes, until the sauce has thickened. Remove the pan from the heat, add the shrimp and any juices from the dish to the sauce. Drain the pasta and add to the sauce and toss to completely coat.

To serve:
Divide the Shrimp Fra Diavlo between 4 bowls (or plates) for entrée portions, or 6-8 for appetizers or small plate portions. Garnish with fresh chopped Italian parsley.

**Note ~ My Italian friends believe it is a sacrilege to add grated Parmesan Reggiano to seafood pasta dishes. I am a Scot and I generally do not. But, there are times I just want a little cheese with my seafood pasta! So, if you want cheese, please go for it!!

Friday, June 17, 2016

Vegan Meatballs

My friend, Janet, came for a visit to Korea. As she is now vegan, we decided to have some fun baking these wonderful meatballs with the Textured Vegetable Protein she brought with her. These are really delicious. Serve with your favourite sauce.

Vegan Meatballs
by Nancy Follwell and Janet Grice

1 cup warm water
1 heaping Tablespoon Low Sodium Chicken Salt
2 cups TVP (Textured Vegetable Protein)
1 large onion, cut into quarters
2 garlic cloves, peeled and halved
1/2 cup cilantro
1/2 cup firm tofu
1/2 Tablespoon Barbeque Chicken Salt
1 cup cooked rice (I used Jasmine)
1 cup vegan breadcrumbs
2 Tablespoons olive oil

Place the warm water in a bowl, add the Low Sodium Chicken Salt and stir. In a food processor, add the broth and the remaining ingredients. Pulse to combine.

With a medium scoop, make meatballs and place on a greased baking tray. Bake at 375°F for 40 minutes.

Thursday, June 16, 2016

Savory Churros with BBQ Aioli

Savory Churros with BBQ Aioli
By Tracy Hersh

BBQ Aioli
1/2 cup mayonnaise
1/4 cup olive oil
1 Tablespoon Jada Barbeque Chicken Salt
1 Tablespoon lemon juice

Savory Churros
1 cup water
1 teaspoon Jada Tumeric Chicken Salt
1 stick butter
1 cup flour
3 eggs
Vegetable oil for frying
2 scallions, finely chopped

Prepare Aioli by combining all of the ingredients and whisking vigorously until smooth and combined. Set aside

In a small saucepan, whisk water and Turmeric Chicken Salt. Heat until simmering. Add the butter and whisk until butter is melted. Add the flour to the saucepan and stir until it is combined and smooth. Remove from heat and let cool enough to add the eggs without cooking them, about 10 to 15 minutes.

When batter is cool, add the eggs, one at a time, until they are combined and batter is smooth. Add the batter to a pastry bag fitted with a star tip. Chill in the refrigerator about 30 minutes. This allows the dough to hold shape when frying. Meanwhile, pour oil into a cast iron skillet on medium-high to 375°F. When oil is hot, pipe the dough into the oil about 3 to 4 inches long and cut with kitchen shears. Fry about 1 minute per side or until they are golden brown. Remove with a slotted spoon and drain on paper towels. Garnish with scallions and serve with BBQ Aioli

Wednesday, June 15, 2016

Crispy Lime Chickpeas

My family loves a crispy snack and these chickpeas are so much healthier than chips. I love that they are so easy to make and high in protein. These make a great mid-afternoon snack when my kids have been playing all day long. I absolutely love that Jada Foods Chicken Salt is vegan! I was so surprised and knew that I wanted to make a recipe that would be vegan. This snack is one that I know I will be making all summer.

Crispy Lime Chickpeas
Serves 4-6
by Lindsay Blogging at Kitchen Musings Today

2 15-ounce cans of chickpeas or 3 cups cooked chickpeas
1 teaspoon olive oil
1 teaspoon Jada Foods Lime Chicken Salt, extra for serving

1. Preheat oven to 400°F. Line a baking sheet with parchment paper.

2. Drain and rinse chickpeas. Lightly dry with paper towels and place the chickpeas in a medium bowl. Add olive oil and lime salt. Stir to coat the chickpeas. Transfer the seasoned chickpeas to the prepared baking sheet.

3. Bake the chickpeas for 20 minutes. Remove the baking sheet from the oven and give the chickpeas a little shake. Return to the oven for 10 minutes. Remove from oven and give the chickpeas a shake. Taste a chickpea (carefully, they will be hot). If they are not crispy return to the oven. Check every 5 minutes until they are crispy. Sprinkle with additional lime chicken salt and allow to cool ten minutes, transfer to a serving dish.

These are best eaten the day they are made.

Tuesday, June 14, 2016

Shrimp Tacos

Living in Texas, Tex-Mex food is aplenty with numerous options for tacos on the menu. Shrimp Tacos are some of our favorites to make at home for a quick and easy weeknight meal. The zest of the lime, the spice of the red pepper and the smokiness of the barbecue in the Chicken Salt products from Jada work perfectly with this dish.

Shrimp Tacos
by Tonda

1/2 cup sour cream
Juice of 1 large lemon
1/2 teaspoon Jada Lime Chicken Salt
1/2 teaspoon Jada Red Pepper Chicken Salt
1/2 cup cilantro

Add all ingredients to a mini food processor and process until the cilantro is chopped fine. Refrigerate while cooking the shrimp to allow the flavors to marry.

1 Tablespoon olive oil
1/2 medium onion, sliced thin
1 pound raw peeled and deveined jumbo shrimp
1 teaspoon Jada Barbecue Chicken Salt
1 bag Angel Hair Coleslaw
6-8 flour tortillas
1-2 limes

Heat tortillas in a small skillet, one at a time over medium-high heat. Set aside and keep warm.

In a medium sized frying pan, saute the onion in olive oil until translucent. Add shrimp, sprinkle the Jada Barbecue Chicken seasoning on the shrimp, and saute approximately 4 minutes depending on the size of shrimp used, or until done.

Add some coleslaw in the warm tortillas and top with shrimp and sauce. Squeeze fresh lime on top, if desired.

Monday, June 13, 2016

Shrimp Linguine with Avocado Sauce

The versatile flavors of Jada Chicken Salt are the perfect addition to your spice rack and kitchen table. Starting with a base of Pure Ocean Sea Salt, the Chicken Salt blends from Jada contain NO manufactured food additives, and are kosher parve, vegan, and gluten free. I loved using both the Red Pepper blend (which has a nice kick!) and the Lime blend in this quick and easy pasta dish. Change up the protein, or just serve the pasta by itself! The rich, creamy avocado sauce tastes a lot more decadent than it really is!

Shrimp Linguine with Avocado Sauce
by Gary Gee, blogging at My Cooking Blog
Adapted from Spaghetti with Avocado Sauce
Serves 6-8

1 pound medium shrimp, peeled and deveined
2 teaspoons Red Pepper Chicken Salt, or to taste
3 Tablespoons extra virgin olive oil, divided use
1 pound dry linguine
2 large or 3 medium avocados, halved, pitted, peeled, and cut into chunks
1 clove garlic, run through a press
1 Tablespoon chopped shallot
1 Tablespoon chopped fresh parsley, plus more for garnish
Juice of one lime
2 teaspoons Lime Chicken Salt
Freshly ground black pepper
Lime wedges, for garnish (optional)

Pat shrimp dry and season with Red Pepper Chicken Salt. Drizzle with one Tablespoon olive oil, toss to coat, and set aside.

Cook pasta in a large pot of salted boiling water until just al dente.

While pasta cooks, grill shrimp over charcoal, gas, or indoor grill pan, about two minutes per side, until slightly browned and just cooked through. Do not overcook. Remove from grill, cover and set aside. Prepare sauce by placing avocado, garlic, shallot, parsley, lime juice, Lime Chicken Salt, and pepper in a processor. Pulse until blended. Add remaining olive oil and process until smooth.

Drain pasta, reserving 1/2 cup cooking liquid. Add reserved cooking liquid to sauce and process until smooth.

Toss pasta and shrimp with avocado sauce until well coated. Transfer to serving platter and garnish with parsley and lime wedges, if desired. Serve immediately.

Friday, June 10, 2016

Bread & Butter Pickles

It’s not every day an amazing sponsor sends a true variety of flavors to play with! Chicken Salt now has a front and center position in my spice cabinet. I tasted each of the 6 varieties I received and was immediately drawn to the Turmeric Salt. The salts are all vegan and will work for any style of cuisine. My first thought with the Turmeric Salt was to stick with a vegan recipe. I decided Bread & Butter Pickles would be a great way to feature the Turmeric Salt. Bread & Butter Pickles are a great condiment for so many dishes, not all vegan of course. We love them on burgers and chopped into tuna salad, or just straight out of the jar. The result was incredible!

Bread & Butter Pickles
by Susan Ritchie-Hubbard

5 cups sliced seedless cucumbers (I used a mandolin, 1/4-inch slice)
1 large sweet onion, halved and thinly sliced
1 Tablespoon, plus 1 teaspoon Turmeric Salt
1 1/2 cups crushed ice
1 1/4 cups apple cider vinegar
3/4 cup, plus 2 Tablespoons granular sugar
1/4  teaspoon Turmeric Salt
1/4 teaspoon ground turmeric
2 teaspoons good quality pickling spice (I used Penzey’s)

Combine the cucumber, onion and Turmeric Salt in a large bowl. Add the crushed ice and place a smaller bowl on top weighed down with either kitchen bricks (I have two standing by wrapped in foil, or a gym weight that weighs 5 pounds.) Let stand for 2 1/2 to 3 hours. Transfer the cucumber and onion to a colander and rinse thoroughly. Both the cucumber and onion will have absorbed the turmeric from the salt.

Preheat the oven to 275°F. In a large heavy bottom sauce pan, add the cucumber and onion, vinegar, sugar, Turmeric Salt, turmeric and pickling spice. Over medium heat, bring to just under a boil. As soon as you see it about to boil, remove the pan from the heat.

During the salt “curing” process, the cucumber and onion gave up a lot of their natural liquid. After being bathed in the beautiful simmer, there is a smaller yield. Divide the pickled cucumber and onion between the sterilized jar size of your choice and top with the pickling liquid, leaving 1/2 of head room. My mother did not always use the pressure canning method for foods we would be eating quickly. Place the jars on a rimmed baking sheet and place in the preheated oven for 20 minutes. Remove from the oven and let stand on the stovetop. As the jars begin to cool, you will hear the seal “snap” into place. Once the pickles have completely cooled, refrigerate for 2 weeks and try to be patient!

I will tell you, these pickles will last up to 2 months in the refrigerator, but you will be making more before time is up!

Thursday, June 9, 2016

BBQ & Cheddar Chicken Dip

Ever go to a party and someone has brought that delicious chicken dip? Here's my take on the classic recipe. I made the hot sauce optional, as my son doesn't like spicy food. This is a sure crowd pleaser.

BBQ & Cheddar Chicken Dip
by Holly K.

3 chicken breasts
1 Tablespoon Jada Foods Chicken Salt Barbecue Seasoning
1 Tablespoon Jada Foods Chicken Salt Red Pepper Seasoning

Cooking spray
2 8-ounce tubs whipped cream cheese
1 bunch scallions, thinly sliced
1/4 cup ranch dressing
1 cup shredded sharp cheddar cheese
1 Tablespoon Frank's Red Hot sauce (optional)

Combine the salts in a bowl. Spray a glass cooking dish with cooking spray. Coat the chicken breasts on both sides with the blend and bake at 350˚F until done.

Add the cooked chicken breasts to a stand mixer and shred. Add the cream cheese, scallions, ranch and cheddar until smooth. Mix in the hot sauce (optional).

Serve with crackers and vegetables.


Wednesday, June 8, 2016

Chicken Salt Grilled Cheese

The fine folks at Jada Chicken Salt were kind enough to send all of us at 37 Cooks a generous sampling of all their Chicken Salt flavors to use and come up with some original recipes. When I signed up for this particular challenge, I had no idea what I was gonna make. At lunchtime one day, I came up with an inspiration! I was planning on making a grilled cheese sandwich and thought I'd try the Chicken Salt on it! Now, most grilled cheese sandwiches are made using butter on the outside of the bread. But, I've been using mayo instead and I thought, why not use Sriracha mayo along with the Chicken Salt? Here's what I ended up with!

Chicken Salt Grilled Cheese
by Matt the Butcher

2 slices plain white bread
2 slices deli-style American cheese
1 teaspoon Low Sodium Chicken Salt
1/2 teaspoon Barbeque Chicken Salt
2 or 3 teaspoons Sriracha mayo


Preheat a small cast iron skillet over medium heat until drops of water sizzle when sprinkled in it. While the pan is heating, lay out the 2 slices of bread. Sprinkle the Chicken Salts on the bread slices and spread the Sriracha mayo over the Chicken Salt. Lay one slice of bread in the hot pan, mayo side down. Next, lay the 2 slices of cheese on the bread and top with the other slice of bread, mayo side up. Cook until nicely browned, then flip and cook the other side and there ya go! The best grilled cheese ever!!

Tuesday, June 7, 2016

Red Pepper Chicken Salt Burnt Butter Pasta

This is quick and easy - and the addition of the Chicken Salt gives it an inviting flavor. For this recipe, I used the Red Pepper Chicken Salt, and you get a slight kick on the back side of each bite.

Red Pepper Chicken Salt Burnt Butter Pasta
by Glenn Edwards
Adapted from Food.com's Pasta and Burnt Butter Sauce

8 ounces uncooked angel hair pasta (half of 16-ounce box, or pasta of your choosing)
Water for boiling pasta
2 teaspoons of Red Pepper Chicken Salt, divided
1/2 cup of unsalted butter
1/2 teaspoon of red pepper flakes
1 Tablespoon of dried parsley

Boil water for pasta and put 1 teaspoon of the Red Pepper Chicken Salt in the water. Once the water starts to boil, put in the uncooked pasta. Once the pasta is finished, drain and set aside.

Melt the butter over medium to high heat until frothy and add 1 teaspoon of Red Pepper Chicken Salt. Make sure the butter is a golden brown color. Return the cooked pasta to the pan with the melted butter, toss and coat evenly. Add the red pepper flakes and dried parsley and serve!

Monday, June 6, 2016

The Chicken Salt Challenge


Let’s hear it for 37 Cooks’ latest sponsor, Chicken Salt! After a successful Kickstarter campaign in 2015, the Miami couple behind Jada Spices released Chicken Salt to great acclaim in the vegan and kosher-parve communities. Our cooks were thrilled to have the opportunity to cook not only with original Chicken Salt, but also with some great new flavors, which will be available soon!

Chicken Salt is a 100% authentic vegan, kosher-parve seasoning with a unique chicken flavor. It’s made with pure ocean sea salt, turmeric, onion powder, and garlic powder. Despite its name, Chicken Salt contains no chicken ingredients, but it does taste like chicken, making it absolutely safe for vegans. It is gluten-free and MSG-free, with no sugar, soy, or chemicals added. It is perfect for paleo and vegan diets! It’s also a great alternative to chicken bouillon! A truly all-purpose seasoning, Chicken Salt has found its way across the road into dishes ranging from meats and seafoods, to popcorn, French fries, and salads! Add some to your favorite recipes!

If you’re interested in learning more about Chicken Salt, visit their website! You can also find them on Facebook, Twitter  and Instagram!

Friday, June 3, 2016

Avocado Lime Soup with Sweet Italian Chicken Sausage

The amazing and multi talented Instant Pot makes every meal a huge time saver! Try this avocado soup and be ready for dinner in less than 30 minutes. Perfect if you’ve had a busy day at work, or the kids are starving after a long soccer practice. Add a simple salad or some steamed veggies and you have a quick, healthy and nutritious meal.

Avocado Lime Soup with Sweet Italian Chicken Sausage
by Lori C.
Serves 4-6

3 True Story Sweet Italian Chicken Sausages - find them at Costco
Enough olive oil for sautéing
1/2 of a large onion, diced
1 bunch green chard, coarse chop
3 very ripe avocados
4 cups water
1 tablespoon Better Than Bouillon Chicken Base
5 tablespoons chives, chopped (save 2 Tablespoons for garnish)
1/2 teaspoon lime zest, packed in teaspoon
Juice of 1 lime
1 Tablespoon Jada Chicken Salt Lime seasoning
1/3 cup whole milk Fage Greek Yogurt 
1 8-ounce carton Organic Valley Whipping Cream

Begin by heating your Instant Pot on the Sauté - Normal setting. Add a bit of olive oil just so there is no sticking while cooking and brown the 3 chicken sausages. Once browned, remove from the pot and slice into 1/4-inch thickness and set aside.

Add more olive oil to the pot, add onions and chard and saute until cooked down. Add avocado, water, chicken bouillon, 3 Tablespoons chives, lime zest, lime juice and Jada’s Chicken Salt Lime seasoning. 

Use a hand blender to blend to a semi-smooth consistency, then change to the Sauté - Less setting and continue to heat through with the lid on, stirring frequently.

While soup is heating through, take 1/3 cup yogurt and hand whip in a small bowl, then add just enough whipping cream to arrive at the consistency of sour cream. You’ll use this for a garnish along with the remaining chopped chives later.

When your soup is heated to your liking, you’re ready to go! 

I garnish with a dollop or two of yogurt-cream blend, and some chives. This pairs nicely with a minty cucumber, onion and kalamata olive salad, and steamed beats.

I hope you enjoy this hearty, quick and delicious meal!

Galbi Jjim aka Korean Soy Braised Short Ribs for a school night

This is a quick weeknight version of a traditional Korean dish called kalbi jjim, aka beef short ribs braised in soy sauce. The traditional recipe usually involves preparing the dish a day in advance to allow the flavors to meld and is frequently seen at large celebratory gatherings. Well, I love it and think people should be able to enjoy this type of meal any day of the week...even a school night with nothing to celebrate beyond enjoying a good meal. The Instant Pot is kind of a no-brainer tool for helping to achieve that kind of meal when you're short on time and energy.

Galbi Jjim aka Korean Soy Braised Short Ribs
by Woo

3/4 cup soy sauce
1/8 cup dry sherry
1/2 cup chicken stock (homemade, or if using store bought stock use a low or no salt version)
2 Tablespoons sesame oil (I used Kadoya brand, widely available, toasty, not too dark)
4 Tablespoons organic light brown sugar (some versions of this dish are much sweeter, adjust to your preference, but don't completely eliminate the sugar, it is needed to balance the soy sauce)
2.25 pounds boneless short ribs, trimmed of excess fat, cut into large pieces (2" - 3" chunks)
1/2 medium onion, peeled and chopped
1-inch sized piece of ginger, peeled, and finely chopped
1 medium Asian pear peeled, cored and chopped
5 large cloves of garlic, peeled and chopped
4 waxy potatoes. peeled and cubed, set aside
2 large carrots, washed, peeled and cut into 1.5" sections, set aside
1/2 medium onion peeled and chopped, set aside
1/4 teaspoon of ground black pepper
1/4 teaspoon crushed red pepper flakes (optional)
1/2 Tablespoon corn starch
Sliced green onions (optional)
Toasted sesame seeds (optional)

Add all ingredients for the braising liquid into the Instant Pot liner. Stir to dissolve the sugar. Add the beef, first portion of onion, ginger, pear, and garlic to the liquid in the Instant Pot. Give it a stir to evenly distribute all the different components. Make sure the lid is seated properly. I love the easy locking mechanism. Set on the pre-programmed Stew/Meat setting and let it do its thing. This is when you should be starting some rice in your rice cooker or on the stove. After about 25 minutes, the Instant Pot will beep to tell you it's done. Quick Release. If desired, strain and degrease the broth using a gravy separator, or gently push aside the chunks of meat and just skim off the excess fat from the top. The onion, garlic, and pear will have disintegrated into the braising liquid. If you like a slightly thicker sauce, reserve about 1/4 cup of the braising liquid to dissolve some corn starch and keep the remainder of the cooking liquid in the Instant Pot.

Add the vegetables you've set aside: Potatoes, carrots, onion, cook 5 minutes low pressure (and the black pepper and crushed red pepper flakes, if using). Meanwhile, dissolve 1/2 Tablespoon of corn starch in the reserved 1/4 cup of the braising liquid. After five minutes, Quick Release.
Set on Saute, high heat and add the reserved 1/4 cup of liquid with the dissolved cornstarch and bring up to a fast simmer until thickened slightly...this is not supposed to be a thick sauce, but it should have a little body and coat the meat and vegetables. Hit the Cancel button to turn off the heat. Put the lid back on to allow everything to calm down and allow the flavors to become integrated. Garnish with slices of green onions for a pop of freshness and color and a sprinkle of toasted sesame seeds. Optional but really nice. Serve with rice and kimchi.

Now go finish your homework  ;)

Thursday, June 2, 2016

Grandma's Vegetable Beef Soup

Grandma's Vegetable Beef Soup
by Christine

1 pound beef shank
8 cups chicken stock
6 large carrots
3 stalks celery
1 large onion
1/2 head cabbage
1 Tablespoon garlic powder
Salt and pepper to taste

Place beef shank and chicken stock in the Instant Pot. Select meat/stew and then press pressure. The pot will automatically set to 30 minutes. When the time is up, let the pressure release naturally. While you wait for the pressure to release, chop the vegetables.

Remove the beef shank and shred the meat adding it, along with the vegetables, back into the pot. Stir in the garlic powder and close lid. Select soup and then pressure. Again, the pot will automatically set to 30 minutes. When the time is up, let the pressure release naturally.

Season with salt and pepper and enjoy.

Wednesday, June 1, 2016

Doenjang Guk - Korean Soybean Paste Soup


I have adapted this Korean soup recipe, Soybean Paste Soup, to the Instant Pot to make it easier.  

Since living in Korea, I have had this soup many times, as it is a favourite side dish with Korean Barbeque. I have wanted to make it, but I did not know how it was made, or how to attempt it.  My Korean/American friend advised that the website for My Korean Kitchen, was the place to go.  I copied pictures of the items needed and headed to my local Korean grocery store and I was able to find everything. I will now be making this soup often, as it is delicious, and tastes just like the soup from local barbeque.   

Doenjang Guk - Korean Soybean Paste Soup
by Nancy Follwell
Adapted from My Korean Kitchen

1 large Korean zucchini*, 1/2-inch slices, cut into 4
4 small Shitake mushrooms, stem removed, sliced
1/2 small onion, sliced 
125 g tofu, medium firm, cut into small rectangles
1 package Enoki mushrooms, trimmed 2 inch from stems
4 1/2 cups stock (ingredients follow)

Stock:
6 cups water
2 Tablespoons dried seaweed
1/2 Tablespoon anchovy granules
Trimmings from zucchini, onion and mushrooms

Soup seasoning sauce:
3 Tablespoons Korean soybean paste (Doenjang)
1 teaspoon Korean chili paste (Gochujang)
1 teaspoon minced garlic

Start by making the stock, adding all stock ingredients to the Instant Pot. Place the lid on the cooker, lock, press "Soup", adjust time to 5 minutes, high pressure.  When time is up let cooker go into "Keep Warm" mode and change time to 10 minutes.  Then press "Cancel", turn steam handle to "Venting" for a 10 minute natural release. Release the lid and remove the insert with pot holders and strain the stock with a fine mesh sieve and cheesecloth, into a pot, to remove all particles. Clean the insert and place back into the Instant Pot, along with 4 1/2 cups of the stock.

Turn the Instant Pot back to "Soup". Wait 5 minutes until stock warms up again. Mix together the Soup Seasoning sauce ingredients into a small dish and with a fine mesh sieve, sieve through and add into the stock. Discard sauce that does not go through the sieve.  

Add all remaining ingredients, except the Enoki mushrooms.  Place lid on the cooker and leave for 5 minutes. When time is up, set to "Keep warm" and add the Enoki mushrooms. 

The soup is now ready to serve. I like it with some rice, especially if it is too spicy, but can be eaten on its own as well.

*NOTE: If using an American zucchini, add at the end with the Enoki mushrooms.